The best thing about AWS for me has always been that I am not at the mercy of a NetSec team whenever I need to deploy a new network. Having the ability to add and remove networks on the fly for various teams has really accelerated the development in all of our departments.
The Default VPC
Every new AWS account contains a Default VPC in each region. Most low level users are not even aware of this whole portion of AWS as they are just launching services into the Default VPC. Well that is all fine and dandy, but what if you want something more secure and compliant..
Standard 3 Tier Architecture
- Presentation tier - (Elastic Load Balancers)
- Shared NACL with public access to ports 80 & 443.
- Logic tier - (Application Services)
- Shared NACL with access to ports 80 & 443 from only the Presentation tier
- Data tier - (Database Services)
- Dedicated NACLs for each subnet with access to DB ports from each respective Logic tier
By creating isolated networks you are allowed to define who can access data and services. In addition you can now segment out you applications without fear of them talking to each other.
VPC Design
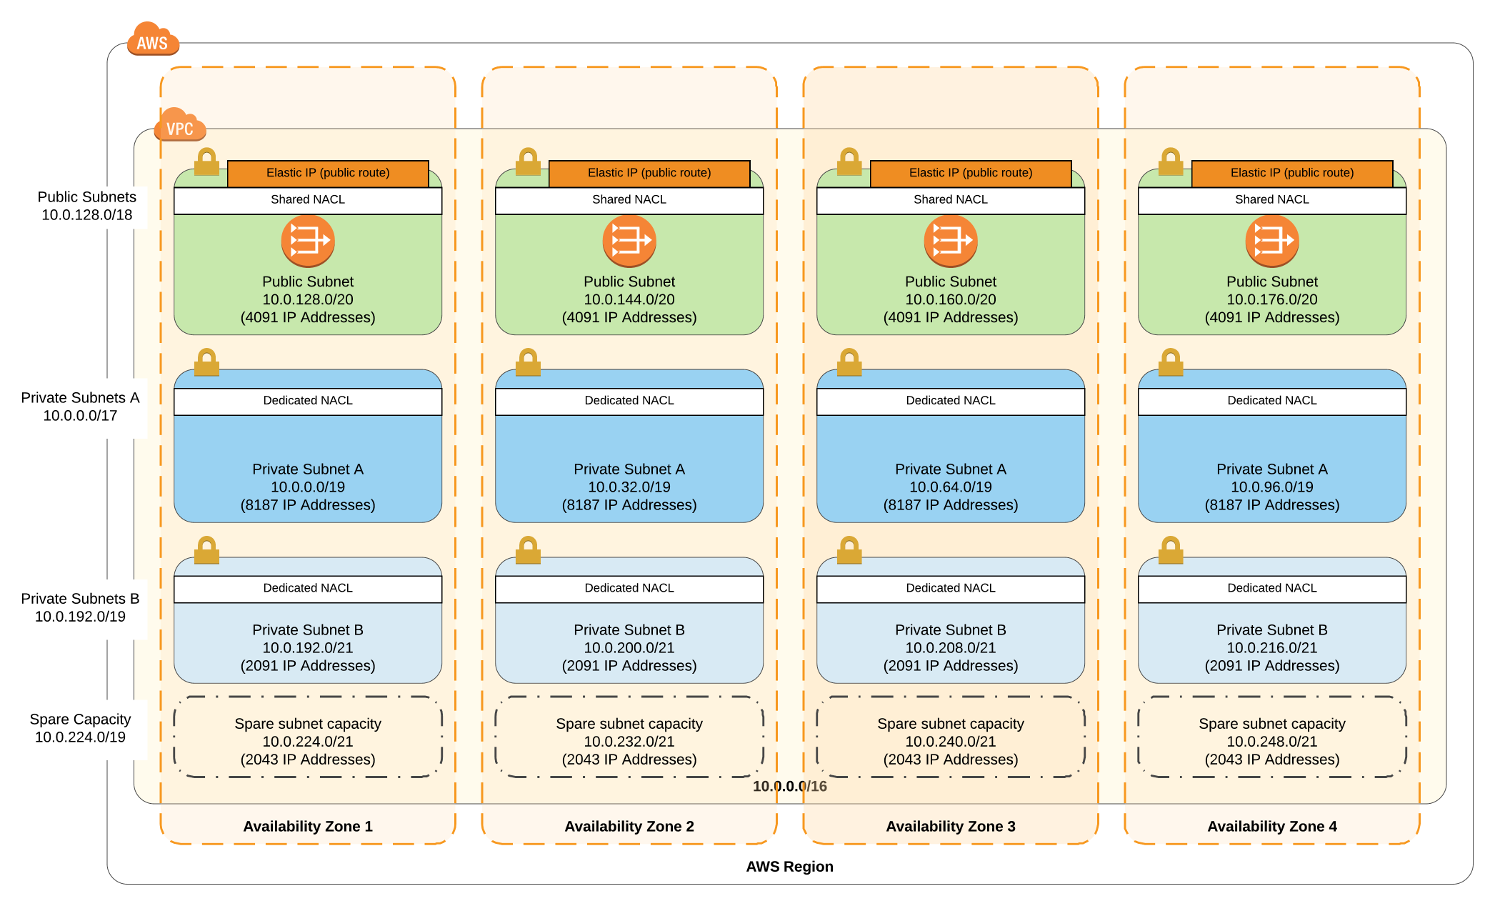
- 10.0.0.0/16 VPC
- Public Subnets
- 10.0.128.0/18
- NAT Gateways with ElasticIPs
- Shared Route Table
- Shared NACL
- Private Subnet A (Logic/App tier)
- 10.0.0.0/17
- Dedicated Route Table using NAT Gateway
- Dedicated NACLs
- Private Subnet B (Database tier)
- 10.0.192.0/19
- Dedicated Route Table using NAT Gateway
- Dedicated NACLs
- Spare Subnet Capacity
- 10.0.224.0/19
You can of course run your VPC in just one Availability Zone if you are doing some easy testing/development. Most users however will prefer to have their VPC design to utilize 2-4 AZs. Once you spread beyond that you should really consider VPC peering.
CloudFormation templates
Feel free to launch the example here or visit the repo for more example templates.
Installation Guide

- Click Next to proceed to the next step of the wizard.
- Change the stack name if you wish.
- Choose the the Availability Zones you want for your VPC.
- Set the Number of AZs to match the amount picked for Availability Zones
- Change any other desired options.
- Click Next
- Click Next to skip the Options step of the wizard.
- Click Create to start stack creation.
- Verify that stack reaches the state of CREATE_COMPLETE